SpringSecurity란?
Spring 기반의 애플리케이션 보안(인증과 권한, 인가)을 담당하는 스프링 하위 프레임워크
인증과 인가에 관한 부분을 Filter 흐름에 따라 처리
보안관련 로직을 따로 작성하지 않아도 된다는 점에서 편리
Filter vs Interceptor
- Filter : Dispatcher Servlet으로 가기 전에 적용되므로 가장 먼저 URL을 받음
- Interceptor : Dispatcher와 Controller 사이에 위치
Deprecated.WebSecurityConfigureAdapter
Spring Security 5.4 이후부터 WebSecurityConfigurerAdapter가 Deprecated 되었습니다. 더 이상 해당 클래스는 사용하지 않고 아래와 같이 사용합니다. 이번 프로젝트는 SpringBoot 2.7.14를 사용하므로 기존 방식 사용 가능
- SpringSecurity에서 보안 구성을 원하는대로 조작하고 싶을 때, 인증/인가와 관련된 설정 관리를 하고 싶을 때, WebSecurityConfigurerAdapter을 상속받아 구현
- @EnableWebSecurity 어노테이션을 설정 파일에 사용
- 왜 이전 공통 프젝은 이걸 사용안하고도 동작했을까?
- 의존성을 통해 Spring Boot는 스프링 시큐리티를 자동으로 설정해줌. 자동 설정이 활성화되면, 기본적으로 @EnableWebSecurity가 내부적으로 사용됨.
- 왜 이전 공통 프젝은 이걸 사용안하고도 동작했을까?
HttpSecurity
세부적인 보안 기능 설정하는 api 제공
- 구성할 수 있는 항목들
- 리소스( URL ) 접근 권한 설정
- 커스텀 로그인 페이지 지원
- 인증 후 성공/실패 핸들링
- 사용자 로그아웃
- CSRF 공격으로부터 보호
WebSecurity
특정 요청들 무시할 때 사용 js, css, image파일 등 보안 필터를 적용할 필요가 없는 리소스 설정 가능
- 보안에 적용될 필요가 없는 경로를 설정해 불필요한 필터링 없애기
- SpringSecurity에 swagger3.0 예외 생성하는 코드
//http://localhost:9090/swagger-ui.html
@Override
    public void configure(WebSecurity web) {
        web.ignoring().antMatchers(
                // Swagger UI 관련 리소스 경로
                "/v3/api-docs/**",
                "/swagger-ui/**",
                "/swagger-ui.html"
        );
    }
인증 vs 인가
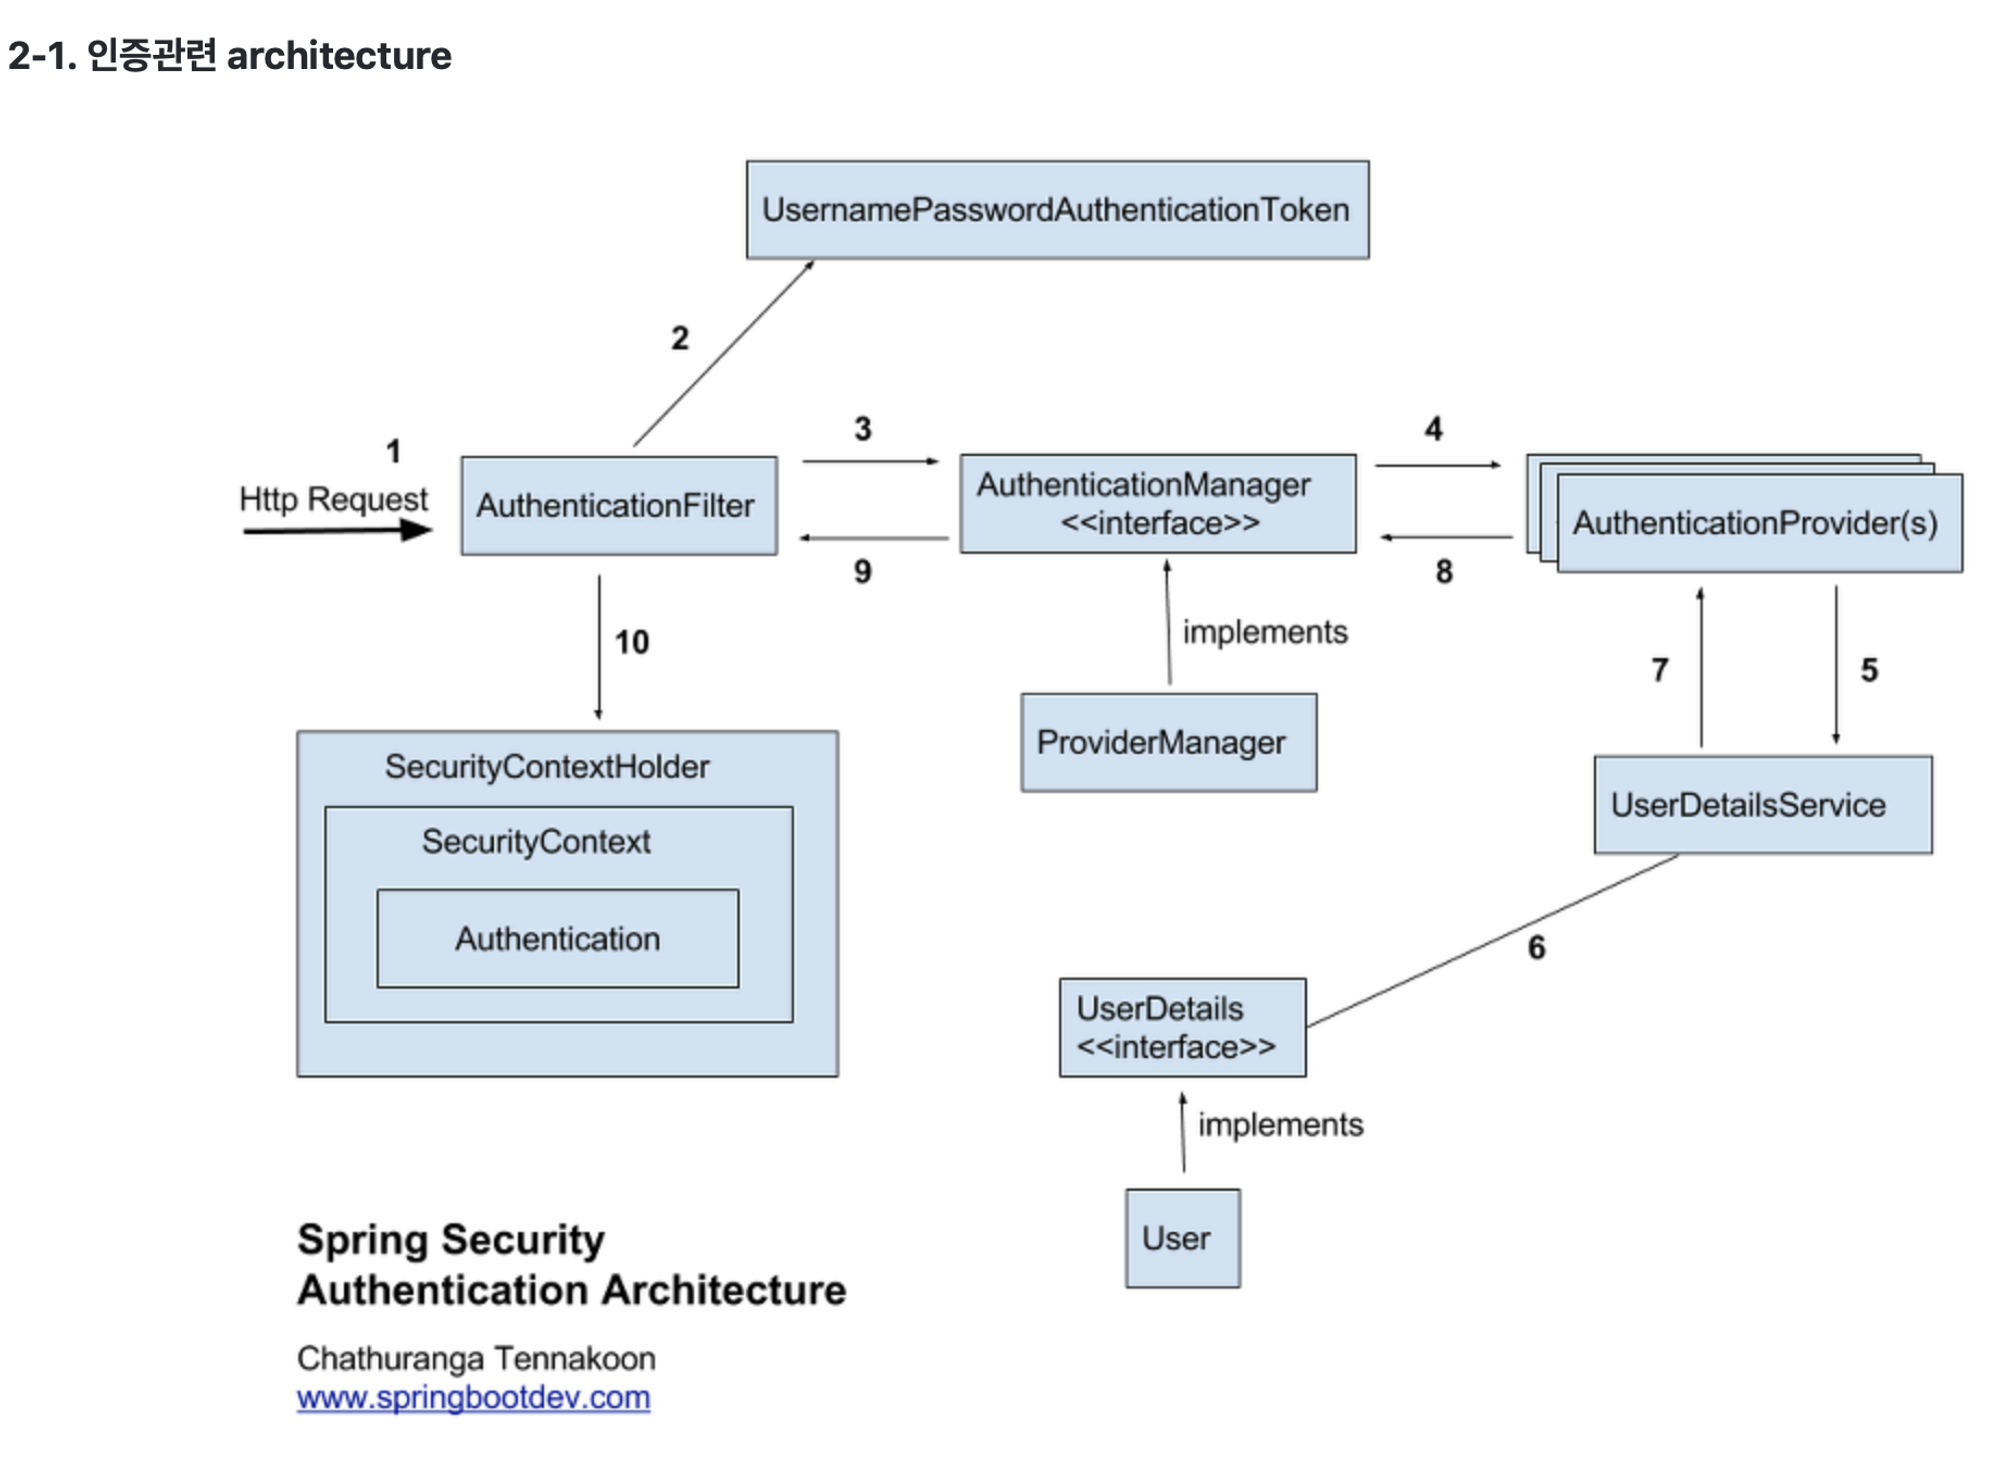
Authentication(인증)
실제 인증에 관련된 정보를 담은 객체
인증의 주체(Principal)과 권한(Authorities), 비밀번호(Credentials)등의 정보를 보관
SecurityContextHolder를 통해 현재 요청의 인증정보를 얻을 수 있다.
SecurityContextHolder.getContext().getAuthentication();
- 대표적인 설정들
http.formLogin()
http.logout()
http.csrf()
http.httpBasic()
http.SessionManagement()
http.RememberMe()
http.ExceptionHandling()
http.addFilter()
Authentification
- 실제 인증에 관련된 정보를 담은 객체
- 인증의 주체(Principal)과 권한(Authorities), 비밀번호(Credentials)등의 정보를 보관
- SecurityContextHolder를 통해 현재 요청의 인증정보를 얻을 수 있다.
SecurityContextHolder.getContext().getAuthentication();
- 대표적인 설정들
http.formLogin()
http.logout()
http.csrf()
http.httpBasic()
http.SessionManagement()
http.RememberMe()
http.ExceptionHandling()
http.addFilter()
SecurityContextHolder
SecurityContext로 감싼 인증객체를 보관하는 보관소
SecurityContext
인증정보를 감싸는 객체로 추가적인 속성을 정의한다.
public class SimpleSecurityContext extends HashMap<String,Object> implements SecurityContext {
    // Hashmap으로 인증정보를 관리
}
UsernamePasswordAuthenticationToken
Authentication의 구현체중 하나로, 사용자의 아이디와 비밀번호를 각각 Principal과 Credential로 사용.
만약 ID, PW방식이 아닌 다른 인증방법을 사용한다면 그 상황에 맞게 Authentication의 다른 구현체를 사용하여 인증정보를 보관하면 된다. 필자는 소셜로그인을 구현하며 OAuth2LoginAuthentificationToken을 활용했다.
AuthenticationProvider
실제 인증로직이 수행되는 곳으로, 인증 전 Authentication 객체를 받아서 인증이 완료된 객체로 반환한다.
AuthenticationManager
AuthenticationFilter에 의해 호출되어 실제 인증에 사용될 Provider를 선택하고, 인증을 수행한다. 인증에 성공하면 인증된 Authentication객체에 부가정보를 추가하거나 기밀을 제거하는 등의 처리를 거친 뒤 Authentication객체 AuthenticationFilter로 반환한다. 별도의 인증로직을 사용하기 위해서는 AuthenticationProvider의 구현체를 만들고 AuthenticationManager에 등록하면 된다.
UserDetails
인증된 사용자 정보를 담는 VO(Value Object)로 UsernamePasswordAuthenticationToken의 Principal로 사용된다. 일반적으로 UserDetails 구현체에 DB에서 조회한 사용자 정보를 담아서 사용한다.
public interface UserDetails extends Serializable {

	Collection<? extends GrantedAuthority> getAuthorities();

	String getPassword();

	String getUsername();

	boolean isAccountNonExpired();

	boolean isAccountNonLocked();

	boolean isCredentialsNonExpired();

	boolean isEnabled();

}
UsernamePasswordAuthenticationToken - UserDetails의 관계와 비슷하게 OAuth2LoginAuthenticationToken의 Principal로는 OAuth2User를 사용한다.
UserDetailsService
DB에 인증을 요청한 사용자가 등록되어있는지 찾고, 사용자의 정보를 UserDetails에 담아 반환한다. 일반적으로 DB에 접근하기 위해 Repository를 주입받아 사용한다.
Authorization(인가)
- 유저의 권한으로 접근할 수 있는 URI와 접근할 수 없는 URI 구별
- 각 ROLE 마다 접근할 수 있는 경로 패턴 설정
authenticated() : 인증된 사용자의 접근을 허용

fullyAuthenticated() : 인증된 사용자의 접근을 허용, rememberMe 인증 제외

permitAll() :  무조건 접근 허용

denyAll() :  무조건 접근을 허용하지 않음

anonymous() : 익명사용자의 접근을 허용

rememberMe() :  기억하기를 통해 인증된 사용자의 접근을 허용

access(String) : 주어진 SpEL 표현식의 평가 결과가 true이면 접근을 허용

hasRole(String) : 사용자가 주어진 역할이 있다면 접근을 허용

hasAuthority(String) :  사용자가 주어진 권한이 있다면

hasAnyRole(String...) : 사용자가 주어진 권한이 있다면 접근을 허용

hasAnyAuthority(String...) : 사용자가 주어진 권한 중 어떤 것이라도 있다면 접근을 허용

hasIpAddress(String) : 주어진 IP로부터 요청이 왔다면 접근을 허용
- 예제코드
- 위 코드에서 ①과 ②의 순서가 바뀌면 permitAll이 우선 적용되어 ①의 효력이 없어지므로 주의
- 더 좁은 범위의 인가 설정을 먼저 해야 함.
@Override
protected void configure(HttpSecurity http) throws Exception {
    http.authorizeRequests()
    	.antMatchers("/user/", "/orders")
        .hasRole("ROLE_USER")                        // ①
        .antMatchers("/", "/**").permitAll()         // ②
}
Filter
- Spring Security에서는 인증, 인가에 대한 처리를 여러 개의 필터를 연쇄적으로 실행하여 수행(FilterChain)
- WebSecurityConfigurerAdaptor를 구현한 설정 파일의 내용을 기반으로 필터 생성
- HttpSecurity : 실제 필터를 생성하는 클래스
- HttpSecurity의 코드를 보면 DefaultSecurityFilterChain 객체 생성 또는 addFilter메소드와 같이 필터를 다룸
- 설정 파일 별로 필터 목록을 갖게 된 후, WebSecurity 클래스에 전달되고 WebSecurity는 FilterChainProxy를 생성자의 인자로 전달
- ⇒ FilterChainProxy는 각각의 설정 클래스 별로 SecurityConfig1, SecurityConfig2 로 필터목록을 갖고 있는 형태가 됨
사용자 요청이 들어오면
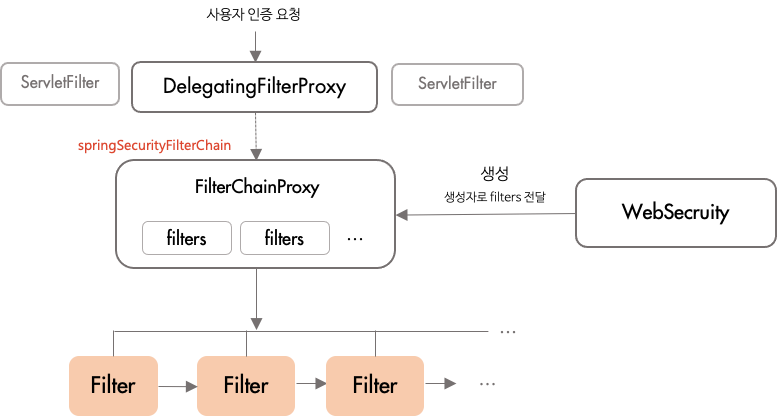
- DelegatingFilterProxy가 요청 받음
- 서블릿 필터. 위임 시, springSecurityFilterChain이라는 이름의 Bean을 찾음
- FilterChainProxy에 요청 위임
- 상단 설명의 SpringSecurityFilterChain이라는이름의 Bean이 바로 FilterChainProxy
- FilterChainProxy는 위임받은 요청을 보유중인 filter들에게 순서대로 맡김
- 각각의 filter들이 체인으로 연결되어 수행 후 넘김을 반복하는데, 이 때 수행되는 메서드가 doFilter
FilterChain
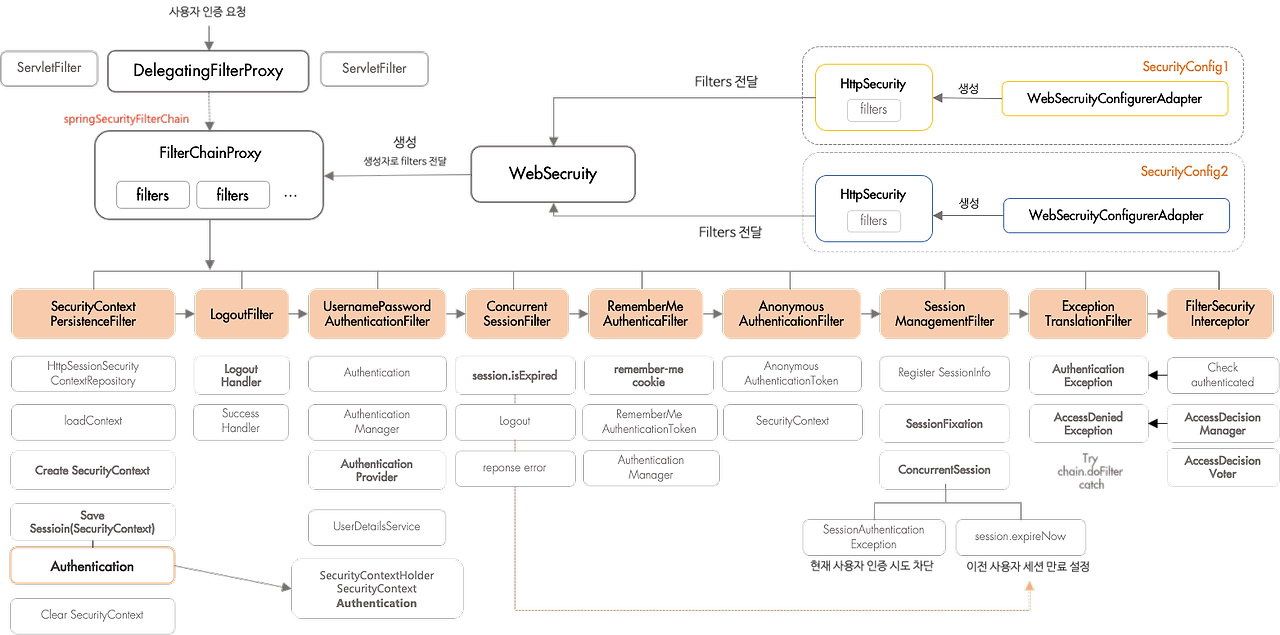
아래의 Filter목록은 SpringSecurity에 기본적으로 내장되어 있는 Filter들이다. 특별히 동작이 필요한 경우에는 SecurityConfigurerAdapter 를 상속받은 설정 클래스에서 메서드를 오버라이드 하여 세부설정을 한다. 별도로 추가하고 싶은 필터가 있다면, **HttpSecurity**의 addFilter, addFilterBefore, addFilterAfter 메서드를 사용하여 체인에 추가할 수 있다.
- SecurityContextPersistenceFilter
- SecurityContextRepository 는 내부적으로 HttpSessionScurityContextRepository 클래스를 가지며 이 클래스가 SecurityContext객체를 생성하고 세션에 저장
- 인증을 시도한 사용자가 이전에 세션에 저장한 이력이 있는지 확인
- 처음인증 또는 익명의 사용자의 경우 SecurityContext 생성하여 SecurityContextHolder 안에 저장 후 다음 필터 실행
- 이력이 있다면, 기존 SecurityContext를 꺼내와서 SecurityContextHolder 안에 저장
- 모든 작업 후, 클라이언트에게 인증하기 직전에는 항상 Clear SecurityContext 실행
- SecurityContextRepository에서 SecurityContext를 가져오거나 생성
- LogoutFilter
- 로그아웃 요청 처리. 로그아웃 url에 대한 요청을 감지하여 로그아웃 로직 실행
- UsernamePasswordAuthenticationFilter
- HTTP 요청에서 사용자 이름과 비밀번호를 추출
- 추출한 사용자 이름과 비밀번호를 가지고 UsernamePasswordAuthenticationToken 객체를 생성
- 인증 객체를 만들어서 Authentication 객체를 만들어 아이디 패스워드 저장하고 AuthentificationManager에게 인증처리를 맡김
- AuthentificationManager 가 실질적으로 인증 검증 단계를 총괄하는 AuthenticationProvider
- 폼 기반의 로그인 인증을 처리하는 데에 사용
- ConcurrentSessionFilter
- 동시세션 제어를 담당. 하나의 계정으로 동시에 여러 곳에서 로그인하는 것을 제한 가능
- RememberMeAuthenticationFilter
- 이거 이번 프로젝트에 사용해야겠다 !!!!!!!!!!!!!!!!!
- Remember Me 기능 처리. 이전에 로그인하여 RememberMe 옵션을 선택한 사용자를 자동으로 인증
- AnonymousAuthenticationFilter
- 익명 사용자에 대한 Authentication 객체를 SecurityContext에 설정하는 역할. 즉, 인증되지 않은 사용자에게도 SecurityContext를 제공
- SessionManagementFilter
- 세션 고정 보호, 세션 타임아웃, 동시 세션 제어 등 세션과 관련된 보안 설정을 관리
- ExceptionTranslationFilter
- 보안 관련 예외를 처리하는 역할 예를 들어, 인증되지 않은 사용자가 보호된 리소스에 접근하려고 하면 이 필터가 AuthenticationEntryPoint를 호출하여 인증 프로세스를 시작
- FilterSecurityInterceptor
- 실제로 리소스에 대한 접근을 제어하는 필터 AccessDecisionManager에게 현재 Authentication과 타겟 리소스에 대한 접근 허가 여부를 물어보고, 결과에 따라 접근을 허용하거나 거부
- 필터 커스텀 설정 예시 코드(UsernamePasswordAuthenticationFilter 설정 변경)
@Configuration
@EnableWebSecurity
public class SecurityConfig extends WebSecurityConfigurerAdapter {

    @Autowired
    private MyAuthenticationProvider authenticationProvider;  // 커스텀 AuthenticationProvider

    @Override
    protected void configure(HttpSecurity http) throws Exception {
        http
            .csrf().disable()
            .addFilterBefore(new CustomFilter(), UsernamePasswordAuthenticationFilter.class)  // UsernamePasswordAuthenticationFilter 전에 커스텀 필터 삽입
            .authorizeRequests()
            .anyRequest().authenticated()
            .and()
            .apply(customConfigurer());  // 커스텀 설정 적용
    }

    private CustomConfigurer customConfigurer() {
        return new CustomConfigurer(authenticationProvider);
    }
}
- SpringSecurity 설정 파일에서 Filter 추가 (순서 적용)
.addFilterBefore(new JwtAuthenticationFilter(jwtTokenProvider, redisTemplate),
                        UsernamePasswordAuthenticationFilter.class)
 // jwt인증 필터를 UsernamePasswordAuthenticationFilter 전에 넣는다.
- 참고 자료
https://ksh-coding.tistory.com/54
Spring Security authorizeRequest.antMatchers() / 인증(Authentication) & 인가(Authorization)의 차이
http.authorizeRequests().antMatchers(”xxx”).permitAll() http.authorizeRequests().antMatchers("/sign-up").permitAll() .anyReqeust().authenticated() ... http.addFilterAfter(jwtAuthenticationProcessingFilter(), LogoutFilter.class); 👉 ”/sign-up” URL
ksh-coding.tistory.com
Spring Security, 제대로 이해하기 - FilterChain
Spring Security, 제대로 이해하기 - FilterChain
Spring Security의 인증, 인가 과정을 FilterChain을 살펴보며 이해하는 것이 본 포스팅의 목표입니다. 해당 포스팅은 1부 Spring Security, 어렵지 않게 설정하기의 이은 포스팅이지만, 읽는데 순서는 상관
gngsn.tistory.com

